
Planet Material Blueprint
This blueprint allows you to add day night cycles to your planets. You can use any texture you want. It includes layered atmosphere elements that pan around the mesh. The great thing about this Blueprint is that you can apply it for other things other than planets! It can be water! Corrosive material, the sky from the ground perspective of a level, windows, you name it!
Material Breakdown
In this video I showcase all the parameters and what each one can do for the material.
First I created a Blueprint of a light source mesh that would store its location in a parameter collection. These coordinates are fed to the material to indicate where the main lighting in the area is located. It tells where to hide the mask that is created on the opposite side of the mesh that will have this material applied to it.
I also added parameters to control the fall-off of the mask.
Light tracker with Parameter Collection

I multiplied the night texture with a vector parameter that controls colors for the night while using a mask texture of cities to the city lights.
I also added normal map for the clouds and terrain.
Night area and Lights colors and Normal Maps

I used bounding boxes to constrict the display of the northern light textures and added a panner node to the alpha to make the night side feel more animated.
Northern Lights and Constraint Parameters

Specular maps helped give the night side of the planet a sheen that created a nice blend between outer-space and the planet. I had to clamp it otherwise the shine would go out of control on the sea

Specular Map
I only used the Specular, Roughness, Emissive, normal and tessellation channels in my project.
Material node

Highlighted in yellow is simple way to create layers withing a material. These can have effects similar to parallax withing an material applied to a mesh. I used this to layer the clouds. I used several panner nodes to animate the clouds.
Parallax Layer Effect and Clouds

I continuously used Lerp nodes and added the layers from the terrain, clouds with Panners to give life to the planet. I also used this output to filter their updated locations out of other maps like the Specular map and roughness.
Texture Movement with Parallax Height Layer

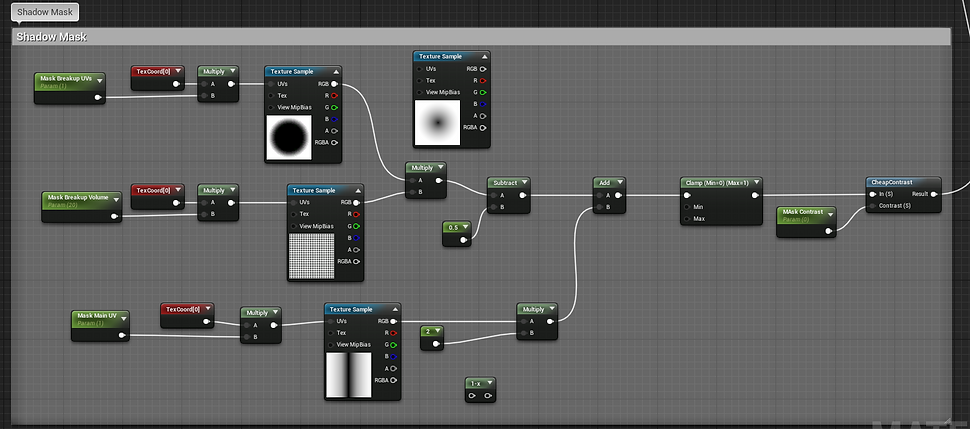
This is the mask that enables the nightside. You can cotrol the size, blend and shape of the planets shadow.
Shadow Masks
Here you can control the color of your atmosphere with parameters for the intensity, reflection, brightness, color and saturation.
Atmosphere

Finally I created another layer for the storm, It uses the same principals as the night side and clouds.
Storms

Material Transition
I created a function to facilitate the transition between materials. It takes 3 Vector inputs for either Color or Textures and 3 Scalar Parameters to control the Fringe (transition%), Blending Distance and Intensity.
Character Variables

This is an example of the function in use. 3 Textures are used as input; One for the fringe, one for each material. 3 Scalar are also used as input; Amount, Gradient, Power. In my planet material at the top of this page I used this function for each input into the material node.
Transition Function Example

Below is an example. I changed the parameters of Amount and Power to 0.5 and 1 respectively. Notice that half the material has changed and the middle area is filled with the blending using black towards the second material. This black area is fringe.
Material Example with Function
